Let me start out by saying very clearly - I don't know the "real way" to make subway art. I don't know what kinds of programs people have that they use to make all the cute printables you see all over the internet. I know there are some programs vinyl cutters use, but I have no idea what those programs are, and I just want to put it out there that I don't actually claim to have any expertise in this field. So if you are a true subway art professional, and I'm doing it all wrong - I'm really sorry!
I received some sweet compliments on my Valentine subway art that I created with MyMemories, and some great encouragement to do a tutorial. But, um, don't you have to be somewhat qualified to do a tutorial? Well I'm not. Oh well.


I made this using MyMemories Suite. I know there are other programs you could use, but I don't know what they're called. I'm really enjoying this program though. I tried to do this in Word, but I couldn't manipulate the text boxes in a Word document to be able to do what I wanted. Maybe I'm just not clever enough to figure it out.
Anyway, I know several of you have this software, and if you don't, it's very inexpensive. AND if you want it, I have a code for you that will get you $10 off.
Anysalespitch....
I'm just going to walk you through the steps that I took to create my subway art. This time I decided to make one for St. Patricks Day (a day very dear to my heart - I'll tell you why some other time).
I started out by just making a list of words and phrases that were related to St. Patricks Day. I'm too lazy to get up and get a pen and paper once I'm sitting at the computer, so I just typed mine up in a word document so I could refer back to it.
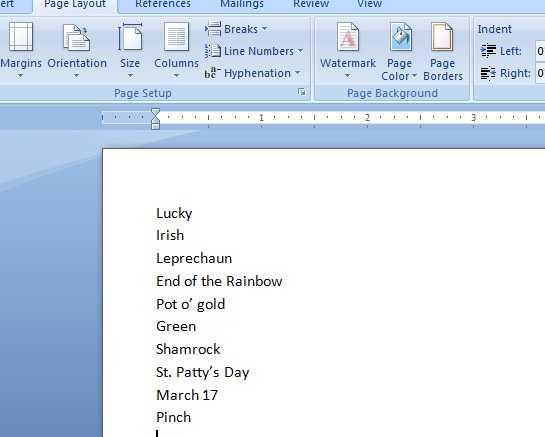
Next I set up my "album" (every new project you do is called an album). I wanted mine to fit an 8x10 frame, so I chose a custom size album and set the dimensions to 8x10.

Then I was all set with a blank canvas and was ready to go! You basically just start adding text boxes, and filling them in. You can rearrange them, change the fonts and colors and just sort of play with the look until you have it just right. It is not complicated, but it can be time-consuming!

I just clicked on the "T" icon to add a text box, and then you can resize and move it however you'd like. I started out with a box in the upper left hand corner, typed my first word, and changed the font and size until I was happy with the look, and then added my next text box.

I wanted some words to run vertically, so once I added a text box, I used the formatting features on the right hand side, and rotated the box to either 90 degrees, or -90 degrees, depending on which way I wanted the word to read. (<----- does that even make any sense?). The cool thing about it? If you double click on the box, it appears horizontal so you can type, but once you're done formatting the text, it rotates back to running vertically.
I was trying a couple of different colors for my fonts when I first started. But then I remembered that with my first one, I had done all the arranging of the words and then gone through and changed the colors. I recommend doing it that way.
I kept adding words, and a few pictures as well. You can find some cute things in the embellishments included with your software, or there are free PNG images online as well.

One very handy feature is the "gridline" option. You can show gridlines, as well as hide them at will, and I found it a great help in making sure my letters and words were all lined up neatly around the edges of my subway art.

You also may notice that some of my words run off into the gray area. The gray area is just a "safety margin" if you are creating pages that you may want to have published into a photo book. It is the area that could be trimmed off, or hidden in the binding of a professionally bound photo book. But since I'm just printing this out on cardstock, I wanted to go closer to the edge of the paper with my printing.
Once I had all my words arranged just how I wanted them, it was time to start changing the colors!

Just highlight the word(s) you want to work with, and again head over to the formatting area on the right. I stuck with just a few different shades of green, and changed them back and forth until I was happy with how the whole thing looked.

Here's how it turned out.

I'm feeling a little bit happy with the results of my 2nd ever attempt at creating my own subway art. Even if I don't really know what I'm doing! You can keep my secret, right? Also, if you know a better, faster way to do this, please be kind and don't point and laugh at the amateur, okay? Thanks.
Just a few more things:
If you are like me and your computer still only has the basic fonts that it came with when you bought it, I downloaded a bunch of these fonts here (they're free!). They have so many cute and fun ones!
If you are interested in this software you can click the button and use this code to receive $10 off your purchase: STMMMS392
If you make some subway art, please let me know so I can come check it out!
If you don't want to make your own, you are welcome to print either of these! Just enlarge the picture, right click, and use the "save as" option to download it to your computer.
And that, my friends, is how it's done! Maybe.
I'm linking up here!
Comments
i love both of them!
It turned out fabulous!
I stopped by from Kristen's and so glad I did. I'm a new follower and look forward to more of your creative talent.
Stop by and say hi when you can ~ I have a giveaway going on now.
Pat