2 posts in 2 days! Can you believe it? Yeah, I'm totally gettin my bloggin' groove back! And I plan to get my crafting groove on this summer too because I have been SLACK-ING! Today I'm taking a baby step and linking up an old post for the Dollar Store Challenge.
But first things first...Yesterday I told you about my dear Hubby's Birthday. How interesting is it that my husband's birthday is just 3 days before my boyfriend's birthday? Yeah...Chris Wingert turns 28 today. Yes, I know he's a little young for me, but age is just a number right?
But first things first...Yesterday I told you about my dear Hubby's Birthday. How interesting is it that my husband's birthday is just 3 days before my boyfriend's birthday? Yeah...Chris Wingert turns 28 today. Yes, I know he's a little young for me, but age is just a number right?
 Happy Birthday Chris!!!
 I told Tanielle I was thinking of jumping out of a cake for him, and she offered to bake it for me. But I think it would have taken all the bags of flour in her whole food storage to bake a cake that huge. It's the thought that counts, right? Now on to the challenge!
I did these projects last fall, and I know we're going into summer, but I thought this was such a fun party that I just couldn't pass it up! So you're just gonna have to deal with the fall-theme. Sorry. Them's the brakes.
For this project I used these awesome poseable fall leaves that came in a 10-pack from the Dollar Tree, as well as a dollar store picture frame that I spray painted and distressed a little. I also used some scrapbook paper from my stockpile and spray glitter. Those of you who know me know that spray glitter is my true BFF.

 I sprayed the leaves with glitter, followed by a coat of clear acrylic spray to keep it from wearing off, cut the scrapbook paper down to size and glued it all how I wanted it (glue stick on the paper, and just a couple of dabs of hot glue for the leaves) and there you go!
 The picture doesn't do it justice, it's very pretty and sparkly! This project cost me $2, because I already had the paper and glitter spray. It helped me turn this:
Into This!: Next I took these fun little gourds. They have those little plastic beads on them that make them kind of sparkly, you know what I mean? Anyway, I confess that these actually came from Walmart, not the dollar store...but they were still only $1!
 These flowers that WERE from the dollar store,
 And I glued the flower heads around the base of the Gourds...I love how they turned out! I used them to replace the candles I had in my candle holders on the mantel.


My mantel BEFORE: And AFTER!:
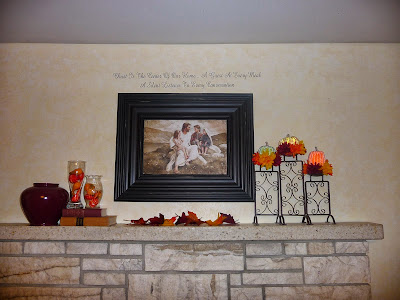 See how cool the leaves look, just scrunched a bit? And the glass and vase on the left are just filled with little mini-gourds I picked up from the dollar store...something so simple, but it really adds a lot to the mantel.
Last I took more of those Dollar Tree flowers, and this grapevine wreath that also was from Walmart...it cost me $3! (gasp!). I rounded up a few pinecones from my backyard, glittered them with my spray, and also used a few small pumkins I had left over from another project. I arranged everything how I wanted it,then went through and secured it all to the wreath with my hot glue gun.
Again, the picture doesn't do justice, you can't see the sparkles! And the flash doesn't show the true vibrancy of the colors. Please excuse the messy work surface, it's still on my craft table!

 Here's a little close-up so you can kind of see how full it is!
This whole project cost me $8...Do you know how much one of these is at a boutique, or a home decor store?
So next time I blog about a craft...it will be new! Promise! For now head over to the CSI Project to check out more Dollar Store Crafts, or to link up your own!!
 Next I took these fun little gourds. They have those little plastic beads on them that make them kind of sparkly, you know what I mean? Anyway, I confess that these actually came from Walmart, not the dollar store...but they were still only $1!
 These flowers that WERE from the dollar store,
 And I glued the flower heads around the base of the Gourds...I love how they turned out! I used them to replace the candles I had in my candle holders on the mantel.
My mantel BEFORE:
 And AFTER!:
 See how cool the leaves look, just scrunched a bit? And the glass and vase on the left are just filled with little mini-gourds I picked up from the dollar store...something so simple, but it really adds a lot to the mantel.
Last I took more of those Dollar Tree flowers, and this grapevine wreath that also was from Walmart...it cost me $3! (gasp!). I rounded up a few pinecones from my backyard, glittered them with my spray, and also used a few small pumkins I had left over from another project. I arranged everything how I wanted it,then went through and secured it all to the wreath with my hot glue gun.
Again, the picture doesn't do justice, you can't see the sparkles! And the flash doesn't show the true vibrancy of the colors. Please excuse the messy work surface, it's still on my craft table!

 Here's a little close-up so you can kind of see how full it is!
This whole project cost me $8...Do you know how much one of these is at a boutique, or a home decor store?
So next time I blog about a craft...it will be new! Promise! For now head over to the CSI Project to check out more Dollar Store Crafts, or to link up your own!!
![]()
Comments
I was at Kohl's today and they already had out a few fall decor items! I couldn't believe it!
I loved that mantel makeover. :)
now me and my boyfriend a little more than a few years, gerard butler.
I call him Ger, ...lol
Your baby is hot.
Wait. That sounds gross, huh?
Welcome back!